

Docker How To Create A Container
Pipeline is designed to easily use Docker images as the execution environment for a single Stage or the entire Pipeline. Meaning that a user can define the tools required for their Pipeline, without having to manually configure agents. Practically any tool which can be packaged in a Docker container. can be used with ease by making only minor edits to a Jenkinsfile.
Jenkinsfile (Declarative Pipeline)
pipeline { agent { docker { image ' node:14-alpine ' } } stages { stage( ' Test ' ) { steps { sh ' node --version ' } } } } Jenkinsfile (Scripted Pipeline)
node { /* Requires the Docker Pipeline plugin to be installed */ docker.image( ' node:14-alpine ' ).inside { stage( ' Test ' ) { sh ' node --version ' } } } When the Pipeline executes, Jenkins will automatically start the specified container and execute the defined steps within it:
[Pipeline] stage [Pipeline] { (Test) [Pipeline] sh [guided-tour] Running shell script + node --version v14.15.0 [Pipeline] } [Pipeline] // stage [Pipeline] } Workspace synchronization
Short: if it is important to keep workspace synchronized with other stages, use reuseNode true. Otherwise, dockerized stage can be run on any other agent or on the same agent, but in temporary workspace.
By default, for containerized stage, Jenkins does:
-
pick any agent,
-
create new empty workspace,
-
clone pipeline code into it,
-
mount this new workspace into container.
If you have multiple Jenkins agents, your containerized stage can be started on any of them.
When reuseNode set to true: no new workspace will be created, and current workspace from current agent will be mounted into container, and container will be started at the same node, so whole data will be synchronized.
Jenkinsfile (Declarative Pipeline)
pipeline { agent any stages { stage( ' Build ' ) { agent { docker { image ' gradle:6.7-jdk11 ' // Run the container on the node specified at the top-level of the Pipeline, in the same workspace, rather than on a new node entirely: reuseNode true } } steps { sh ' gradle --version ' } } } } Jenkinsfile (Scripted Pipeline)
// Option "reuseNode true" currently unsupported in scripted pipeline Caching data for containers
Many build tools will download external dependencies and cache them locally for future re-use. Since containers are initially created with "clean" file systems, this can result in slower Pipelines, as they may not take advantage of on-disk caches between subsequent Pipeline runs.
Pipeline supports adding custom arguments which are passed to Docker, allowing users to specify custom Docker Volumes to mount, which can be used for caching data on the agent between Pipeline runs. The following example will cache ~/.m2 between Pipeline runs utilizing the maven container, thereby avoiding the need to re-download dependencies for subsequent runs of the Pipeline.
Jenkinsfile (Declarative Pipeline)
pipeline { agent { docker { image ' maven:3.8.1-adoptopenjdk-11 ' args ' -v $HOME/.m2:/root/.m2 ' } } stages { stage( ' Build ' ) { steps { sh ' mvn -B ' } } } } Jenkinsfile (Scripted Pipeline)
node { /* Requires the Docker Pipeline plugin to be installed */ docker.image( ' maven:3.8.1-adoptopenjdk-11 ' ).inside( ' -v $HOME/.m2:/root/.m2 ' ) { stage( ' Build ' ) { sh ' mvn -B ' } } } Using multiple containers
It has become increasingly common for code bases to rely on multiple, different, technologies. For example, a repository might have both a Java-based back-end API implementation and a JavaScript-based front-end implementation. Combining Docker and Pipeline allows a Jenkinsfile to use multiple types of technologies by combining the agent {} directive, with different stages.
Jenkinsfile (Declarative Pipeline)
pipeline { agent none stages { stage( ' Back-end ' ) { agent { docker { image ' maven:3.8.1-adoptopenjdk-11 ' } } steps { sh ' mvn --version ' } } stage( ' Front-end ' ) { agent { docker { image ' node:14-alpine ' } } steps { sh ' node --version ' } } } } Jenkinsfile (Scripted Pipeline)
node { /* Requires the Docker Pipeline plugin to be installed */ stage( ' Back-end ' ) { docker.image( ' maven:3.8.1-adoptopenjdk-11 ' ).inside { sh ' mvn --version ' } } stage( ' Front-end ' ) { docker.image( ' node:14-alpine ' ).inside { sh ' node --version ' } } } Using a Dockerfile
For projects which require a more customized execution environment, Pipeline also supports building and running a container from a Dockerfile in the source repository. In contrast to the previous approach of using an "off-the-shelf" container, using the agent { dockerfile true } syntax will build a new image from a Dockerfile rather than pulling one from Docker Hub.
Re-using an example from above, with a more custom Dockerfile:
Dockerfile
FROM node:14-alpine RUN apk add -U subversion By committing this to the root of the source repository, the Jenkinsfile can be changed to build a container based on this Dockerfile and then run the defined steps using that container:
Jenkinsfile (Declarative Pipeline)
pipeline { agent { dockerfile true } stages { stage( ' Test ' ) { steps { sh ' node --version ' sh ' svn --version ' } } } } The agent { dockerfile true } syntax supports a number of other options which are described in more detail in the Pipeline Syntax section.
Using a Dockerfile with Jenkins Pipeline
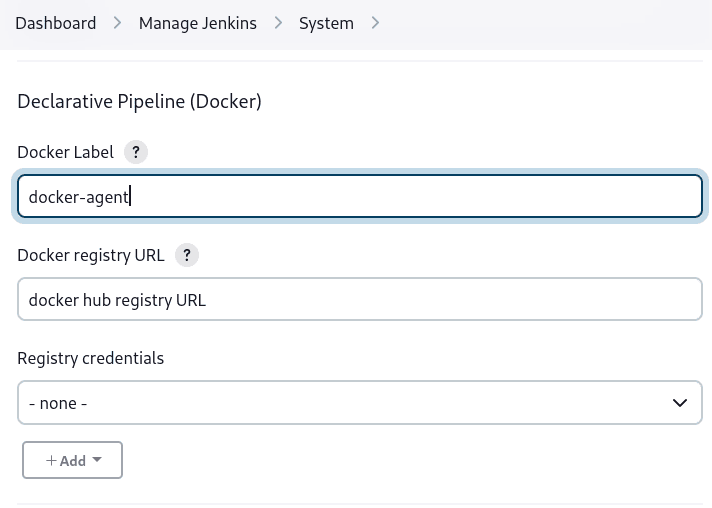
Specifying a Docker Label
By default, Pipeline assumes that any configured agent is capable of running Docker-based Pipelines. For Jenkins environments which have macOS, Windows, or other agents, which are unable to run the Docker daemon, this default setting may be problematic. Pipeline provides a global option in the Manage Jenkins page, and on the Folder level, for specifying which agents (by Label) to use for running Docker-based Pipelines.
Docker How To Create A Container
Source: https://www.jenkins.io/doc/book/pipeline/docker/
Posted by: lopezunpleted.blogspot.com
0 Response to "Docker How To Create A Container"
Post a Comment